Friday, April 11, 2014

Reusable Cloths for a Dust Sweeper

Here's something that requires zero sewing: duster cloths. Instead of constantly buying (and trashing) these things, why not be resourceful? Leftover pieces of fleece would be best, but you could use any fun-looking fleece that catches your eye at the store. I'd personally like to find some fleece with a kitchen-related print... Oh, and to have enough for 8 cloths, just ask for 1/3yard. I only spent a buck!

When you get your fabric home, get out a pair of fabric scissors and cut 8" X 11" rectangles.


That's it. Really! Fleece doesn't fray, so don't worry about that. Just toss them in the wash when they get dirty. Beats the pants off disposables!


And here's a tip, I found I can "charge" them up with static cling, and the dust will just jump right off the floor. Okay, well it's not a magic method, but I definitely notice an attraction!

Saturday, April 5, 2014

Another Way to Gather

This is another way to gather- as in, not the technique in this post. With this new way, a string is used instead of tension. It requires a bit of skill, but practice makes better with this one.

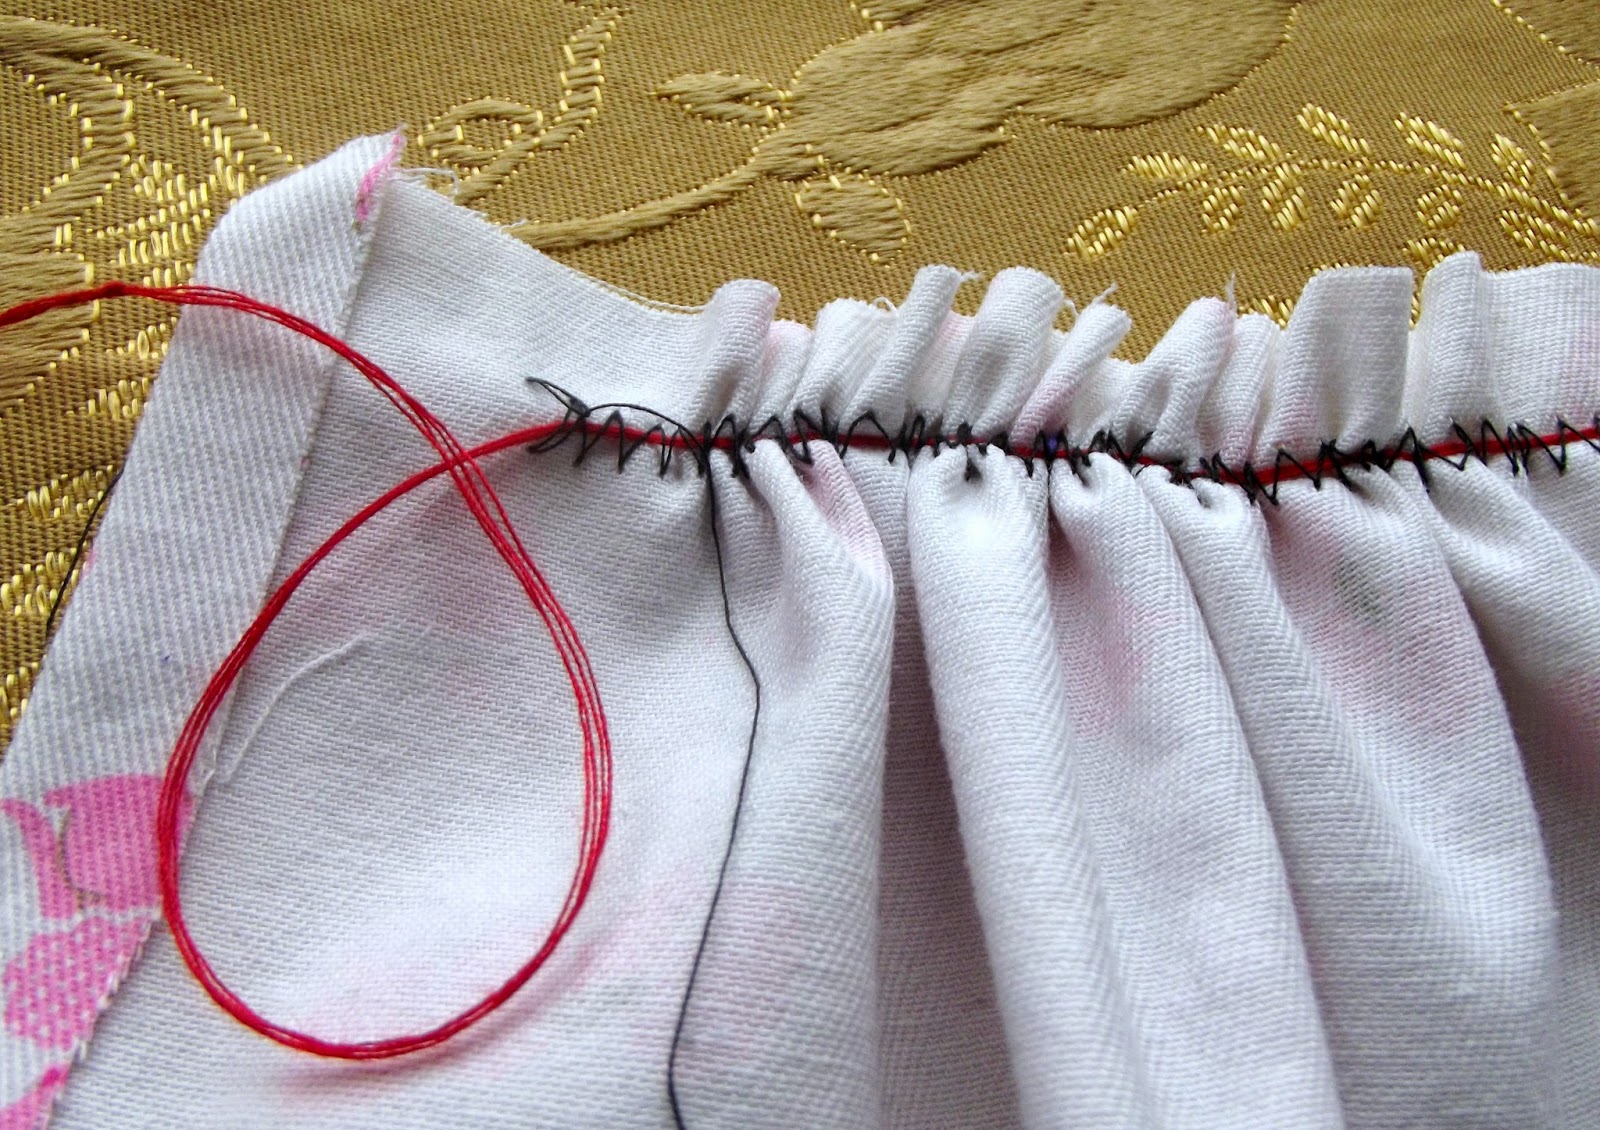
You'll need "gathering cord" (really, just a thin string) and fabric.

Place your fabric on the machine with the "wrong" side up, and lay your string across the length you're sewing.


Use a zig-zag stitch and carefully "jump" over the string, essentially sewing a stitch on either side of the string as you go. Do your best not to catch your string with the needle! You will want to sew the narrowest zig-zag your string will allow. Too wide of a zig-zag will cause the fabric to pucker.


Once it's sewn, go ahead and adjust your ruffles. Lock them in if you have to (simply pin or hold in place, and sew a straight stitch across).


To make it easier, try pinning your string to the "start point" and "end point" of your line (keep the string on there by wrapping it in figure eights). Just pull the string as you sew and you'll be ready to go, no adjustment necessary.

Without a doubt, the best way to utilize this method is with a five- or seven-hole multi-cord foot. Just thread the string through the center hole and use a wide zig-zag stitch. But if you don't have one, just use this method. It's very quick and only requires a little bit of concentration.

Thursday, April 3, 2014

Gathering Fabric and Making Ruffles

While making a skirt, I realized that it looked too flat. I decided to gather the fabric at the top of the skirt, in order to give it more body. Of course, that made the skirt too small at the top! So here we go, round two.

Cut your fabric, making it twice (or three times) as wide as your finished product will be.


Turn your tension to the highest it will go, and make sure the stitch is the longest it can be. And pull a good amount of both threads to create a long tail before you work.


Go ahead and sew! As you go, you'll notice that the fabric is curling up and "ruffling." Great!


Leave the tails very long, because you will need to pull the fabric after sewing. Measure the width you'll need for your finished product, and make sure it will work. GENTLY Pull the fabric until it's as wide as you need it to be. Start spreading it out from the outside, working your way in

Be very gentle with your new ruffly fabric edge, since the thread is pulled so tightly that it can break very easily. Put your tension back where it belongs (on my machine, it's in the middle, at the "auto" setting). Go ahead and run the ruffled fabric top back through the machine. Be very careful to keep the ruffles even as you sew; your presser foot will do its best to keep everything flat, and this may or may not keep things even for you. After a pass or two locking in your ruffles, you're ready to add the finishes.


Depending on what you're doing, you can just use some bias tape to finish it off. I made a skirt, so I made a tube of fabric and sewed it over the ruffles so I couldn't see the stitching.


What do you think? Easy, right?